Update 29/01/2019 Since AWS Amplify is out, please find a newer version here.
Update 09/02/2018 I’ve updated this article to remove the EC2 used for draft check (for cost saving). I’m now using an S3 bucket with a custom _config.yml.
Requirement: Before reading this article, please find these how-tos to publish a simple static Jekyll website to S3 using ACM SSL and CloudFront CDN. here, here, or here.
I know, you will tell me, why are you using such a workload to publish a simple blog? It sounds crazy! Why not use Medium instead? The answer is to get my own custom blog platform, and to play with AWS tools and services.
In this article, I will explain how I manage my Continuous Build / Continuous Deployment (CB/CD) pipeline from my IDE to this blog using Cloud9, GitHub, CodeBuild, S3, CloudFront and a Lambda function.
The main idea is to build and push your Jekyll website to your AWS S3 bucket, then force your CDN (CloudFront) to refresh origin.
In my scenario, I’ve activated the GitHub hook to be able to see my drafts from another S3 bucket before pushing to production.
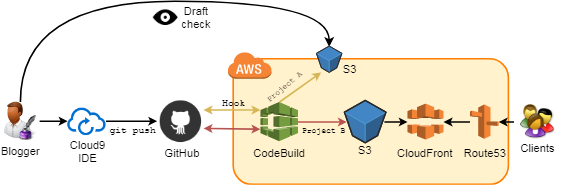
Steps Summary
- I write articles in the Cloud9 IDE.
- Code is committed to a public GitHub repository.
- AWS CodeBuild generates the website (Build) and pushes the result to S3 (Deploy).
- An AWS Lambda function is triggered by AWS S3 events to invalidate AWS CloudFront items (cache refresh).
Cloud9 (IDE)
I’m using Cloud9 to get my configured workspace from everywhere (home, work, travel). If you need offline writing, just git pull locally (super tip).
Create your own private C9 workspace on Cloud9. It’s free for one private workspace.
GitHub (Source Code Repository)
I assume your Jekyll website is already created, same for your GitHub repo.
git commit & git push your Jekyll website to your GitHub repository.
Back to your Cloud9 workspace and git clone REPO_URL.
Now you can write your Jekyll articles from Cloud9 easily. When you’re done, just commit and push your work to GitHub.
CodeBuild (Build & Deploy)
Create your CodeBuild project
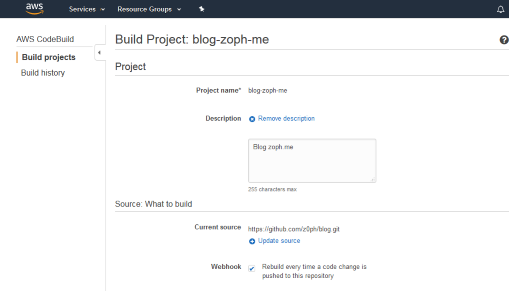

- Project name:
your_blog_name - Source provider:
github - Repository URL:
your_git_repo_url - Webhook: check this if you need to automatically build on any code change on GitHub
- Environment image: Use an image managed by AWS CodeBuild
- Operating System: Ubuntu (currently the only available option)
- Runtime:
Ruby - Version:
ruby:2.3.1 - Build specification: Use the
buildspec.ymlin the source code root directory - Artifact type:
No artifact - Service role: Create a service role in your account
Next, you’ll have to create a buildspec.yml file at the root of your GitHub repository:
|
|
Please take a look at my Gemfile too, it could be useful:
Modify your generated role
Lambda & CloudFront (CDN)
You will find below the Python script from @yagonobre I’m using. For each new file uploaded to S3, this Python Lambda function triggers the invalidation of CloudFront Objects.
Gist: yagonobre/2666c13cd0f339eb00700226abc95195
Here is the role used (change with your Distribution ID):
|
|
Here we go. Now you have a full deployment pipeline from your preferred IDE to S3 using AWS serverless functions and managed services.
That’s all folks!
zoph.